Home & Garden
How a Licensed Surveyor Helps Ensure Council and Building Compliance


A survey plan is the document that tells a council, a lender and a buyer where a boundary runs and what stands inside it. Most homeowners meet the need for one at an awkward moment, midway through a subdivision, a build or a dispute with a neighbour, when the answer is already overdue. The work is not complicated to understand, and knowing what a surveyor does before the need arises is what keeps a project out of trouble.
What a licensed surveyor does
A surveyor measures land and sets out its boundaries, and the profession’s output is a plan that others rely on: councils assessing an application, designers working from levels, and lawyers settling a boundary question. The common jobs are identification surveys, which establish where the boundaries and improvements sit; topographical surveys, which record the levels and features of a site for design; and subdivision plans, which divide one title into several and must be lodged to take effect.
The distinction worth holding onto is between measuring and certifying. A surveyor certifies where the boundary is, having re-established it from the state’s survey records. A surveyor does not certify that a building complies with the building code, that its structure is sound, or who owns the land. Those are separate questions with separate professionals, and a reader who confuses them will ask the wrong person at the wrong time.
When a survey is required
The trigger is usually one of a short list of events.
- Subdivision. Dividing a title requires a plan of subdivision, prepared by a registered surveyor and lodged with the relevant authority.
- A new build or an extension close to a boundary. Designers need the true boundary and the levels before they draw, and councils need the setback confirmed before they approve.
- A boundary question. A fence that seems to sit in the wrong place, a neighbour’s claim, or a discrepancy between the title documents and what the ground shows.
- An easement or a right of way. Establishing where the easement runs, and what may be built near it, is survey work.
- A sale or a purchase. Where structures, fences or titles do not match the records, buyers, lenders and their solicitors ask for a survey before they proceed.
A homeowner who is unsure whether a survey is needed can answer the question by asking what decision depends on it. If a boundary, a level or a right-of-way must be relied on by someone else, a survey is the evidence that decision requires.
What “licensed” means, and how to check it
Registration is granted by state and territory rather than nationally, which means the register that matters is the one for the jurisdiction where the work will be lodged. The titles differ between states, and a surveyor registered in one jurisdiction is not automatically able to prepare plans for lodgement in another.
The check takes minutes. Ask for the surveyor’s registration number, and confirm it against the register that issued it, which is public and searchable. Confirm as well that both the individual and the practice are appropriately registered for the type of plan the job requires. A reader who cannot find the name on a register has learned something important before any money changes hands.
What the surveyor needs from you
The surveyor supplies the measurement, and the owner supplies the context. Title documents, any previous plans, and the location of fences, retaining walls and other improvements all shorten the job. Access matters: the surveyor works on the land, and where the site is tenanted, occupied or locked, that access needs to be arranged in advance. For a subdivision or a dispute, correspondence with the council or the neighbour forms part of the picture and is worth passing on.
Where the property has been altered over decades by successive owners, the surveyor reconciles the records with what is on the ground, and the owner should say what is known about those changes. Old plans and approvals, even imperfect ones, are more useful in the surveyor’s hands than in a drawer.
When to book the work
The survey should precede the decisions that depend on it, which in practice means earlier than most owners expect. For a build or an extension, the survey is booked before design is finalised, not after, because the setbacks, levels and boundary positions shape the design. For a subdivision, the survey comes before the application is assembled. For a purchase where the records do not match, the survey is booked before the contract becomes unconditional, which is the last moment the information can change the decision.
Site works follow the same logic. A driveway, a slab or a retaining wall set out on a wrong line is expensive to undo, and the setting out depends on the survey. The mistakes that cost money when trades are engaged early are not unlike the ones covered in our guide to hiring a concreter, where the pattern is the same: work begins before the facts are settled.
What a survey plan certifies, and what it does not
A plan certified by a registered surveyor shows the boundaries and the position of the improvements relative to them, at a stated date, from a stated set of measurements. That evidence is what a council relies on when it assesses setbacks, what a lender relies on when it takes security, and what a court relies on when a boundary is disputed.
What the plan does not do is certify the building. It does not certify that a structure complies with any approval, that a dwelling is habitable or safe, that the works match the approved plans, or that the land is free of interests that a title search would reveal. A plan also records a moment: improvements added after the survey date are not on it. The check a reader can run is to read the plan’s date and purpose before treating it as current for a new application.
What goes wrong without one
Where a structure is built without approval, or in a position the approval does not cover, councils have powers to require the work to be corrected or removed, and penalties can follow. Where a subdivision proceeds on an unverified plan, the error is discovered at lodgement, with the applicant paying for the correction under time pressure. Where a property is sold with structures that do not match the records, the problem transfers to the buyer’s solicitor and the lender, and the sale can be delayed or repriced.
The pattern in each case is that the survey is cheap relative to what it prevents, and the moment to have it is before the reliance, not after.
When a neighbour’s structure crosses the boundary
An encroachment is a building, fence or structure that physically crosses the boundary line, or sits so close that its footings, eaves or drainage works cross it. The first step is evidence rather than negotiation, because a survey establishes whether the boundary is in fact crossed, and fences and long-standing assumptions are frequently wrong. Until the survey is done, neither neighbour knows what the argument is about.
If the survey confirms an encroachment, the options run in a rough order. A conversation with the neighbour is still the cheapest first move, particularly where the encroachment is small and the neighbour did not know. From there the possibilities widen: an agreement that allows the structure to stay, with the boundary question settled in writing; adjustment of the boundary through the appropriate process; or, where the parties cannot agree, removal of the structure at the owner’s cost.
How a boundary dispute proceeds
A boundary dispute proceeds on documents rather than memory. The survey establishes the line. Title documents and any registered plans come next. Where the parties are willing, mediation resolves many disputes before they reach a hearing, and it is usually the least expensive route. Where they are not, the matter goes to the tribunal or court that handles land disputes in the jurisdiction, and the survey is the evidence the decision will turn on. Legal advice should be taken before that point, not after, because the costs and the remedies change once proceedings begin.
Two practical points apply throughout. Do not move or demolish anything in the meantime, because altering the site complicates both the evidence and the remedy. And keep the correspondence in writing, because a dispute that ends in a hearing is decided on what can be produced, not on what was said at the fence.
Choosing the surveyor
Settle on the firm only after the register check, and treat the quote as secondary to the scope. The quote should state which plan is being prepared, for what purpose, and what is included: fieldwork, lodgement, and any liaison with the council. The check applies to every practice, including Territory Surveys: confirm the registration at the register that issued it, and match the scope of the work to the plan the job requires. A survey that is not fit for the purpose it is bought for is not a saving.
Before you engage anyone
The sequence that keeps a project compliant is not complicated. Establish which plan the decision needs, check that the surveyor is registered for the work in that jurisdiction, book the survey before the design or the works proceed, and read the plan’s date and purpose before relying on it. Boundary questions, subdivisions and builds all resolve on evidence, and the survey plan is the evidence. Everything else, including the approvals that follow, is downstream of getting it right first.







So you’ve got a punnet of tomato seedlings on the back step, the weather has turned mild, and somebody has already told you to wait for Melbourne Cup Day. Maybe it was your nan, maybe a neighbour over the fence. Almost everyone has someone who swears by it, and you might be wondering whether it’s wisdom or just habit.
It’s a bit of both, and that’s good news. The Cup Day rule has a real reason underneath it, and once you know the reason you can work out whether the date suits your garden. This year Melbourne Cup Day falls on Tuesday 3 November 2026, according to Business Victoria. Whether that’s the right day for you depends far more on your soil and your last frost than on a horse race.
What the rule is really protecting
Tomato seedlings are frost tender. A cold night that leaves a hardy winter crop untouched can blacken a young tomato plant, and that’s the loss the old rule was built to prevent. Gardeners picked a date late enough in spring that frost had usually passed, and the Cup was a date everyone remembered.
Here’s the part that surprises people. You don’t need a reading of zero on the thermometer to get frost. ABC reporting on frost explains that it can form when the air is a little above 0 degrees, depending on humidity and cloud cover. A clear, still night can catch you out even when the forecast low looks safe enough.
The other half of the story is the soil. Gardening Australia’s guidance is that soil should be at least 16 degrees for tomatoes, with 18 to 20 degrees better still, and that you should plant after the latest chance of frost, which in cold areas is usually the first week of November. So there are really two tests, and the date on the calendar is only a rough stand-in for both of them.
Spring warming is gradual, and you can see it all around the garden. The same lengthening days that bring a winter-battered lawn back to green are slowly warming your vegie bed from the top down.
One small step for this week: check the forecast overnight lows for the next seven days, and notice how clear and still the nights are meant to be.
Melbourne and cool Victoria: the rule mostly holds
If you garden in Melbourne, your nan was largely right. Early November sits after the frost risk for most of the city, and by then the soil in a sunny bed has usually had time to warm. Planting on or around Cup Day is a sensible, low-fuss choice for a lot of Melbourne gardens.
That said, Victoria isn’t one climate. Colder inland towns and hill areas can stay frosty later into spring than the suburbs near the bay, so if you’re up in the ranges or out on a cold plain, you may need to wait a little longer. That’s fine, and it isn’t a sign you’re doing anything wrong. Waiting for your own conditions is exactly what the rule was trying to teach in the first place.
It can help to think of the year as a calendar of small jobs. In the same way that there’s a right time for what to prune in June, there’s a right window for tomatoes, and it’s set by the conditions rather than a fixed date.
One small step: push a soil thermometer into the bed where the tomatoes will go, and read it in the morning for a few days running. When it’s sitting at 16 degrees or more, you’re in business.
Canberra: slightly early
If you’re in Canberra, the rule needs a gentle adjustment. ABC News looked at Canberra frost data going back to 1940 and found that the final morning of potential frost has fallen, on average, two days after Melbourne Cup Day. So planting on the day itself means planting just before the average last frost.
The same analysis went further, and it’s worth laying the numbers out as choices rather than rules:
- About two days after Cup Day: the average final frost. Planting here is a coin toss on whether a cold morning is still coming.
- 17 days after Cup Day: the point at which you can be 80 per cent confident of avoiding frosty nights. The ABC nicknamed this “Tomato Friday”.
- 43 days after Cup Day: 95 per cent confidence, which takes you well into December.
None of these is wrong. It comes down to how much risk you’re comfortable with and how much effort you’ll put into protecting the plants. If you don’t mind throwing a cover over seedlings on a cold night, an earlier start is fine. If you’d rather plant and forget, waiting for Tomato Friday is the calmer path.
One small step: if you plant in early November, keep something to cover your seedlings handy right through the month, and check the forecast each evening.
Brisbane and the subtropics: late
In Brisbane, it’s a different story, and you may be relieved to hear that you haven’t missed anything by ignoring the Cup. The thing to watch there is the heat. By November, the heat and humidity are building, and with them comes more pressure from pests and disease, which tomatoes don’t love.
The general warm-climate pattern is to plant earlier, from late winter to early spring, and again in autumn, so the plants do their main growing in milder weather. If you’re reading this in late October in Brisbane with no tomatoes in yet, you haven’t failed. You might simply be looking at an autumn crop instead.
One small step: if you’re in the subtropics, jot down a reminder for late summer to plan an autumn planting, and give this spring’s bed to something that enjoys the heat.
Planting well on the day
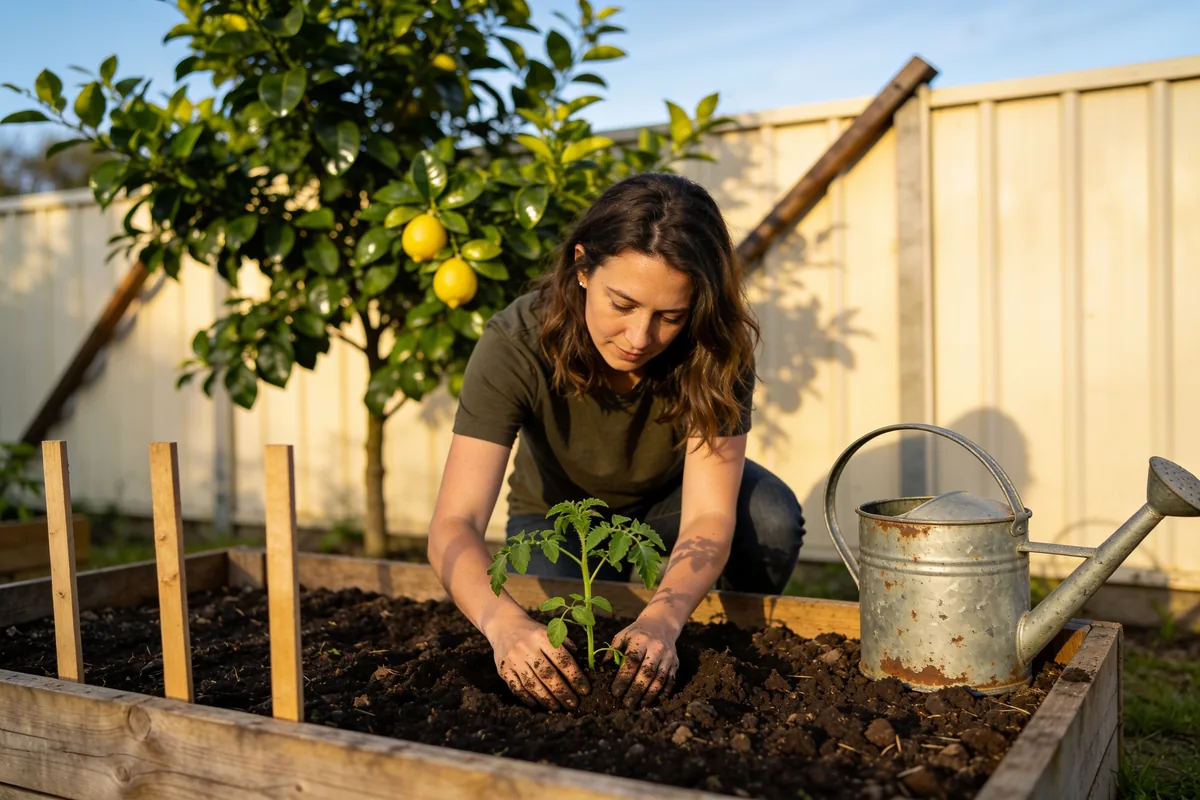
Whenever your day comes, the way you plant matters as much as the date. Gardening Australia recommends planting tomatoes deep. You bury the stem so that only the top leaves sit above the soil, and you take off any leaves that would end up underground. Roots then form along the buried stem.
It feels a little odd the first time, burying most of a seedling you’ve been nursing along. If yours have gone tall and leggy on the windowsill, though, this is good news, because the stretched stem is the part that goes underground.
Light is the other big need. Gardening Australia suggests a spot in full sun, about seven hours a day in cool areas. If your yard is shady, the sunniest spot you have is worth more than the richest soil in a dim corner. A raised garden bed can help here too, because you get to put it wherever the sun falls longest.
One small step: on planting day, dig each hole deeper than feels natural, strip the lower leaves, and water the seedlings in well.
If you’ve already planted early
Maybe the sun came out in mid-October and you couldn’t help yourself. That’s completely understandable, and it isn’t a disaster. Plenty of early tomatoes come through fine with a little care on the nights that matter.

The main thing is to protect them on cold, clear nights. A simple cover over each plant in the evening keeps the worst of the chill off, and you lift it off in the morning so the seedling gets the sun. Watch the forecast, and pay most attention to nights with no cloud and no wind, which are the ones most likely to bring frost.
And if a seedling does get hit and doesn’t come good, try not to be hard on yourself. In cool areas Gardening Australia puts the usual planting time in the first week of November anyway, so a replacement planted then is right on schedule.
One small step: find your covers now and keep them by the back door, so you’re not hunting for them at nine o’clock on a frosty night.
A few questions people ask over the fence
“It’s late October in Melbourne. Can I plant out now?” You might well be able to, and it’s a fair question to ask. Rather than counting days to the Cup, run the two tests. Is the soil in the bed reading 16 degrees or more in the morning? Is the week ahead free of clear, still, cold nights? If both answers are yes, planting a little before the race is unlikely to hurt, as long as you keep a cover handy for the odd chilly evening.
“My seedlings have gone tall and floppy. Have I ruined them?” Not at all. It happens a lot with seedlings raised on a windowsill. Gardening Australia’s deep-planting method suits leggy plants nicely, because the long stem goes underground, the buried leaves come off, and roots form along it.
“I’ve always planted on Cup Day in Canberra and it’s been fine.” That’s genuinely worth something, and nobody is saying you’ve been doing it wrong. On the ABC’s numbers, though, Cup Day sits just before the average final frost. So some years you’ll have planted after the last cold morning, and some years one may still have been on its way. If you’ve never lost a plant, your garden might simply be a little sheltered, or you’ve been lucky with the weather.
“How cold does it have to get for frost?” Not as cold as you’d think. The ABC explains frost can form when the air is a little above 0 degrees, depending on humidity and cloud. A forecast low of a couple of degrees on a clear, windless night deserves a cover.
One small step: write your soil reading and the overnight low on the calendar each morning this week. By the weekend you’ll have your own answer.
Plant by the soil, not the race
The Cup Day rule is a handy reminder that has stuck around because it often gets the timing roughly right, especially in Melbourne. It just isn’t the reason. The reasons are frost and soil warmth, and both of those you can check for yourself.
So here’s the gentle version to take back out to the garden. In cool Victoria, Cup Day is usually a good bet. In Canberra, a little later is safer, and how much later is your call. In Brisbane, the main spring planting is earlier and there’s another chance in autumn. Wherever you are, a soil thermometer reading of 16 degrees or more and a forecast clear of frost tell you more than any date on the calendar.
And if you get it a bit wrong this year, the tomatoes will forgive you. There’s always next spring.
Sources: Top Tomato Tips, Gardening Australia, ABC (https://www.abc.net.au/gardening/how-to/top-tomato-tips/13618668); Heaters on after Anzac Day and tomatoes in after Melbourne Cup? Frost data suggests Canberra folklore is wrong, ABC News (https://www.abc.net.au/news/2023-07-12/frost-data-suggests-canberra-folklore-is-wrong/102590452); Victorian public holidays 2026, Business Victoria (https://business.vic.gov.au/business-information/public-holidays/victorian-public-holidays-2026)

Most of the diagnosis happens before anything is bought. Winter damage is not one condition, and no single purchase fixes all three, so a lawn that is brown in August can be a dormant lawn, a compacted lawn or a dead lawn, and those are three different jobs with three different costs. The first check costs nothing and takes a minute: examine the crown, the base of the leaves, and read the colour. Everything else follows from that reading.
Spring lawn recovery checklist
0 of 9Work top to bottom. The crown test at the top decides whether the rest is worth doing.
The spring order
Recovery takes weeks, not a weekend. If the crown is not white to off-white, the answer is fresh turf, not a treatment.
The crown test, and what each answer means
The crown is where the plant keeps its growing point, so it is the part that says whether there is a plant left to work with. If the crown is white to off-white, the grass is probably still alive, and it can be salvaged with dedication and effort. The test is a five-minute job with a fingernail or a knife at the base of the leaves, and it settles the question the whole checklist depends on.
If the crown is not white, the answer is the hard one. The source is direct on this point: a lawn allowed to die completely will not come back in winter, and fresh turf is the replacement. Watering a dead lawn does not resurrect it, which is why the crown test comes before any purchase, and why the order in the checklist above is not arbitrary. A white crown means the work is justified and the recovery is a matter of weeks; anything else means the money is better spent on turf, and the rest of the list has nothing to offer.
The test also has limits. It reports on the plants in the sample, not on the whole lawn, so it should be run in several spots, including the worst one. A green corner can flatter a lawn that is mostly gone, and a brown patch can hide crowns that are still white, which is why several samples beat one confident glance. It says nothing about why the lawn reached that state, either. That is the soil question underneath it.
Why winter does this
Cold slows growth, which is the dormant lawn and the ordinary case. Wet soil compacts under weight, which is the second case, and the mechanism matters because it explains the recovery order later: in compacted ground, water and air cannot reach the roots, so the grass starves while the surface looks as though it has been watered plenty. Shade and traffic do the rest of the damage between them.
The result is a lawn that can be over-watered and under-fed at the same time. The surface holds moisture, the roots do not get what they need, and the thatch builds up between the two. That is the whole mechanism in a sentence: compaction starves the roots, and the surface hides it. None of that damage is visible from the street, which is why the diagnosis has to go below the surface before the order of work makes sense.
The three cases also explain why the spring work is ordered as it is. Aeration addresses the compaction; the wetting agent addresses water that will not soak in; top dressing addresses the layer between the two. Feeding addresses none of them, which is why it comes last. The order exists because of that mechanism: each step removes an obstacle for the next.
The spring order, and why it is this order
Aeration comes first. It creates small holes so air and water penetrate to the roots, which is the compaction problem addressed at its source, and it is the step that treats the cause rather than the appearance. The source’s specification is holes at least 8 centimetres apart; a pitchfork handles a small area, pronging shoes do the same job as the reader walks, and larger lawns justify hired equipment. The timing for warm-season grasses, which include soft-leaf buffalo, couch, kikuyu and zoysia, is spring, before the summer heat, and the source adds the line that matters for a brown lawn: it is never too late to aerate.
Top dressing comes immediately after aeration or verti-mowing, not weeks later, which is the sequencing most home lawns get wrong. The source’s reason is mechanical rather than aesthetic: the holes are open and the dressing has somewhere to go. Then a quality wetting agent, applied after the dressing, because the source’s own note is that aeration helps manage thatch so wetting agents can penetrate. Then water.
The order is not a preference. Each step opens the way for the one after it: the holes let the dressing in, the dressing and the agent let the water down, and the water finishes the job. Reversed, the same materials sit on the surface and the weekend is spent. That is the sequence in one line: open the soil, dress the soil, wet the soil, then water it. The container on the shelf is not the first step, and on a lawn that has been compacted for years it is nearly the last. The same order applies to a lawn that is only patchy: fewer holes, less dressing, and the same sequence. The crown test decides the case, and the order decides the work.
Where the lawn is beyond saving, the order changes completely. Poor soil is amended or removed and replaced before fresh turf is laid, not after it fails.
Watering, measured rather than scheduled
Watering is where the calendar does the least good and a physical test does the most. The source’s test needs no equipment: tread firmly on the grass, and if it does not spring back, it needs a drink. That reading comes from the plant rather than from a timetable, which is why the test comes before the sprinkler goes on rather than after.
Water in the morning, when there is usually less wind, because the aim is to cut evaporation and get the water down to the roots. The morning run gives the water the best chance to reach the roots before the day’s evaporation starts, which is the only reason the timing is specified. Sprinklers run on the reader’s own watering days, which is a local rule and not something this article can set. It is also the variable that governs everything else in a dry month. The test replaces a schedule with a reading, and the difference matters on a lawn that is recovering, because the water it needs changes as the roots come back.
Water that never reaches the roots is a problem to trace at the source as well, and the site’s guide to stopping a leaky tap covers the other place water disappears on a property.
Mowing as recovery, not maintenance
Mowing during recovery is a cutting decision with two variables, height and frequency, and both follow the variety. For soft-leaf buffalo, the source’s figures are every 7 to 10 days in summer at about 15 to 20 millimetres, which is a higher cut than many lawns receive.
Sharp blades matter more than the height setting. The source goes as far as suggesting a blade change about once a year, because a blunt blade tears grass rather than cutting it, and torn tips are open wounds during the season when the lawn is under pressure. Fewer, higher cuts are the shape the source describes for recovery: mow to the frequency the variety expects, and leave the height where the source puts it.
The limit here is a variety question the article cannot answer from the outside. The mowing height for a specific lawn depends on what is growing in it, and the variety is on the tag, the turf supplier’s record or the original invoice. Mowing is the step where the variety matters most, and the one where a general number is least safe. The source’s figures describe one grass, and they are not a table for all of them.
When it is not the cold at all
Two alternative diagnoses deserve a check before any purchase, because both imitate winter damage and neither responds to the spring order above. Both should be eliminated before the order is followed, because a lawn with either problem will not answer to it.
The first is grubs, which eat the new shoots. Watering does not fix a grub problem, which is the tell: a lawn that stays brown despite moisture may be feeding something else. The second is hydrophobic soil, a known behaviour in sandy ground, where the soil repels the water being applied rather than absorbing it. A wetting agent is the step the order above addresses for that case, and the check is to watch where the water goes when it lands: if it beads and runs, the soil is the problem rather than the grass.
What the article cannot know from outside is which of these applies to a given lawn. That is a sample-and-look question, and the source’s own warning stands over it: where the grass has died completely, watering alone will not bring it back. The limit deserves saying plainly: a photograph cannot show a grub, and a soil that repels water looks the same in a picture as a soil that is dry.
The order that saves the most grass
Recovery takes weeks, not a weekend, and the cheap steps come first. The crown test costs nothing and decides the whole approach. Aeration, top dressing and a wetting agent cost time and modest materials, and they address the compaction that caused the problem. Feeding and heavy watering come last, because a dead lawn does not respond to them and a live one responds better once air and water can reach its roots.
The order is the saving, and it has a check built in at the top. If the crown test comes back white, the rest of the list is worth the work; if it does not, the money belongs in turf rather than in treatments. The cheapest steps are also the earliest ones, which is what the whole order is built on. Run the checklist in sequence, revisit the crown test at the end of spring rather than the end of the week, and the grass that was dormant in August gets its season back.
The list takes a weekend; the results take a season. Everything above is arranged to make the first of those as small as possible. The check at the top is also the one to repeat, at the end of spring, when the answer is either a greener lawn or a clear case for turf.
Sources: Water Corporation – Bring your brown lawn back to life
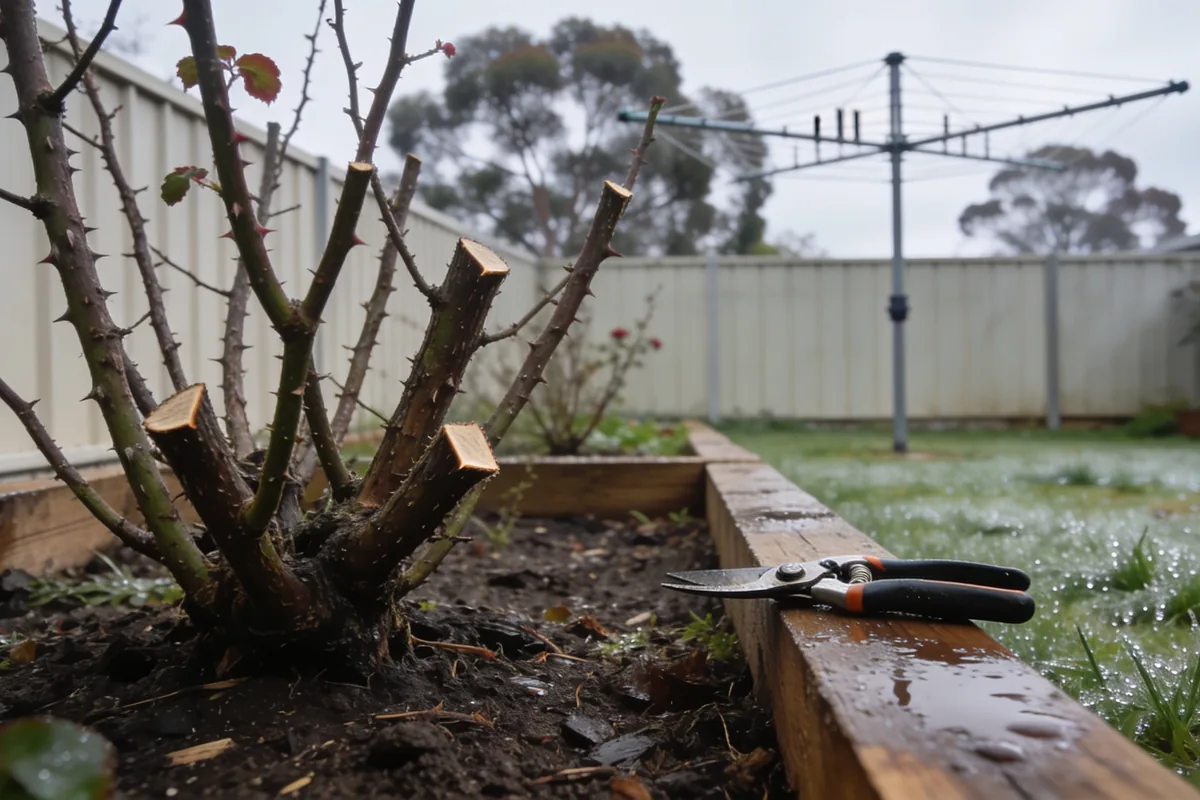
The secateurs are out, the last flowers have gone, and one question is keeping you indoors: is it too early? That worry is a reasonable one, and it deserves a straight answer. Cut a rose back a week before the frosts arrive and the new shoots come away soft; the next cold night takes them, and you spend spring looking at the damage. Here is the reassuring part. The timing is a window rather than a skill, and it is wide enough for most gardens. In most of Australia, the best time to prune roses is June or July. If you live in a really cold area, the advice is to wait until early August, so the frosts do not knock back the new shoots. Most gardens sit comfortably inside that window, and the difference between cutting this weekend and next weekend is far smaller than the difference between cutting now and cutting in May.
It also helps to know which prune you are doing. Roses want attention at least twice a year: a summer dead-heading, where each spent flower is snipped a few centimetres below the bloom, and the harder winter cut that shapes the plant for the season ahead. The June and July question is about the second of those, and it is the one where timing matters. The summer job is forgiving. The winter one is not, because it happens next to the cold. You do not need to be an expert to get this right. You need a pair of sharp secateurs and a week without frost.
One catch sits under all of that, and it is why this question never has a single date. Winter means different weeks in Cairns, in Melbourne and on the Tablelands, and local frost decides your week rather than the month on the calendar. Check the forecast before you check the date.
Why winter is the right season for the hard cut
Winter pruning works because the plant is resting. It is dormant, so the cuts are open but new growth is slow to arrive, and fewer pests and spores are moving about. The frost rule comes from the same place: it is not the cut itself that damages the bush, it is the soft growth a cut encourages too soon, before the cold has finished with your garden. Patience here is not caution for its own sake. It is the whole technique.
The second reason is air. Opening up the centre of the bush so there is more air circulating is a disease measure, not a tidying one. Air moving through the middle, and light reaching the wood, are the point of the exercise, and anything overhead changes how much light gets through. If your roses grow under a patio or a carport, the site’s guide to polycarbonate roofing over a garden is clear about what a cover does and does not change for the plants below it.
There is one more quiet benefit to cutting in winter. With the leaves gone, the frame of the bush is bare, and the shape it will carry into spring is finally visible. That is why this is the cut that sets the structure, and why a few minutes spent looking before the first cut is time well used.
The four cuts that do the work
Four cuts, in this order, do almost everything a winter prune needs to achieve. Work from the top of the bush downwards, and step back between cuts to look at the shape you are making.
- Anything dead, or anything showing dieback, right down to stump level. A stub left below a dead stem is no use to the plant, so take the cut back to sound wood.
- Spindly stems. Follow each one down until it is about the thickness of a biro, and remove it there. These are the stems that will not carry a flower worth waiting for, and they take light and air from the ones that will.
- Anything crossing or crowding the centre. Where two stems rub, keep the one growing outward and take the other, so the middle of the bush opens up and the air can move through it.
- The water shoots, and only lightly. These are the young stems, olive green or pink, and they are where the flowers come from, so they get a tidy rather than a haircut.
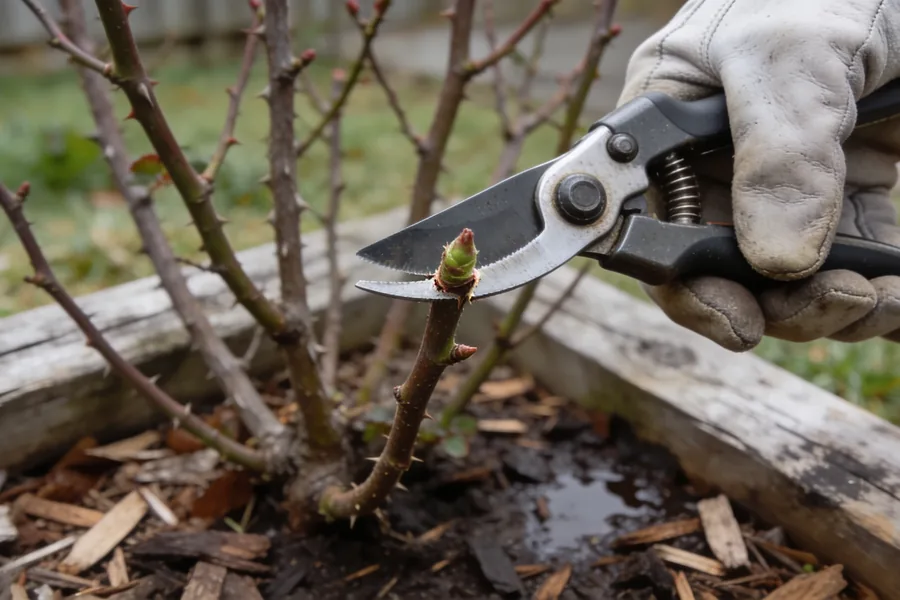
When you make the cut, aim for about a 45 degree angle above an outward facing bud, sloping away from the bud. Rain and dew then run off instead of collecting where the new shoot will form, which is a small thing that helps keep fungal disease away from the wound. The outward-facing part matters for the same reason as the centre cut: the new shoot grows away from the middle of the bush rather than back into it. Work through the four in order, and stop when the middle is open and the strong stems are clear.
How hard to go
How far back you go is a judgement, and the sources offer a scale rather than a rule. If you are a cautious pruner, take about a third off. If you are confident, or the bush has run wild, you can go back by about half. Both are given as sensible choices, so pick the one that matches your confidence and the rose in front of you.
What does not flex is the direction. Cut from the top, and cut to a bud that faces the way you want the new shoot to grow. Every cut is a decision about next season’s shape, which is why stepping back matters more than cutting fast.
There is one more piece of restraint in the sources. Do not rush the winter prune. Let the plant rest first, so the last flowers are enjoyed and the young stems have time to harden off before the cold settles in. A bush pruned in a hurry is a bush that spends winter working instead of sleeping.
And if the two options still feel far apart, the choice comes down to confidence and to the bush in front of you, which is how the source frames it, rather than to a number that has to be exact. A third and a half are both inside the practice. The window matters more than the depth.
The roses that play by different rules
Not every rose in the garden wants the same treatment, and the differences are worth knowing before you start on the row.
- Heritage roses need very little. A light shape, a tip prune and anything dead removed is the whole job, and nothing more is asked of them.
- Ground cover roses can be cut back almost to ground level. They regrow by spring, particularly with fertiliser and mulch through the warmer months.
- Repeat flowering roses are pruned three or four times in a season. The winter prune is the hard one; the others are lighter, and it is the severity that changes, not the technique.
The three or four prunes in a season are not three or four winter prunes. The hard cut happens once; what follows is the light tidying after each flush of flowers, and the bush barely notices it.
The caution from the sources deserves repeating here. In a frost-prone area, leave the pruning until the chances of frost are over. Prune early, and the warm spell that follows can push new growth straight into the next cold night. If the bush has not finished dropping its leaves, it has not finished resting either, so wait.
One more case needs naming, and it does not fit a rule. If your rose flowers on last season’s wood, the winter prune is a different conversation, and it is a question to ask about your own plant rather than something a page can settle. Take a photo of it in flower, ask at a nursery, and prune the rest of the row while you wait for the answer. That is not a gap in the advice, just the limit of what advice can do without seeing the plant.
What to do with the prunings
The prunings go to the bin or the mulch pile. If you have small children at home, sorting the garden waste is one of those jobs they can genuinely take part in, and the site’s piece on recycling ideas for preschoolers turns the sorting into something closer to a game than a chore.
The one thing not to do is feed or water the bush heavily straight after the cut, hoping to push it along. The growth that encourages is soft growth, and soft growth is what the frosts are looking for. Hold the heavy feeding until the cold has passed and the plant is ready to use it. The same restraint applies to water. The instinct after a hard cut is to give the plant something to work with, and the season says otherwise.
Where to make the first cut
Before you start, three checks, and together they take about five minutes.
- Is there a frost forecast in the next week or two? If there is, wait, or start with the roses that sit outside the frost pocket.
- Has the bush lost its leaves? If it is still holding them, it has not finished resting yet.
- Are the secateurs clean and sharp? The job is hard enough without fighting the tools.
Then start where the answer is easiest: the dead wood. The first cut is the one that feels like a decision, and a dead stem is the one cut nobody can get wrong. After that the bush tells you what it needs, and you will wonder why you put it off. And if the forecast turns, nothing is lost by waiting a week. The window is June and July for most gardens and early August for the cold ones, and it will still be open when the frost has gone.
If you are new to roses, the first winter is the one where every cut feels like a risk. Start with the dead wood, take the spindly stems after that, and leave the water shoots alone until you have watched them flower once. The next winter will feel like routine.
If the forecast looks clear and the bush has dropped its leaves, you are ready. Start at the top of the bush, work down, and let the first cut tell you how the rest will go.
Sources: Gardening Australia – Rose Pruning · Heritage Roses in Australia – Rose Pruning


 Healthcare1 year ago
Supported Independent Living Explained: What SIL Covers and Who It Suits
- Food1 year ago
Balance Your Plate, Boost Your Mood: Beginner’s Guide to Eating Well
- Healthcare1 year ago
Oral Health at Every Age: What Changes and What to Watch For
- Healthcare1 year ago
The Allergy You Can’t See: How to Detect and Manage Silent Food Reactions
- Healthcare1 year ago
Occupational Therapy for Children: The Signs It Could Help, and How to Start
- Healthcare1 year ago
Home and Living Support Under the NDIS: What It Funds and How It Fits a Plan
- Business1 year ago
Connections That Count: Why Networking Is Still Crucial for Business Success
- Healthcare1 year ago
When Everyday Tasks Get Hard: What an Occupational Therapist Can Do